Spinning up VMs manually every time is slow and error-prone. A better approach is to build a golden image once — hardened, updated, and pre-configured — then stamp out identical clones in seconds using Cloud-Init. This guide walks through the full process on Proxmox VE.
1. Create and prepare the base VM
Create a new VM in Proxmox as usual and install Ubuntu Server (LTS recommended).
Once the OS is installed, apply your standard hardening and configuration:
- Install required packages (e.g. Docker, monitoring agents)
- Add your SSH public keys
- Disable SSH password authentication
- Configure users, sudo, and firewall rules
This is the base image every future clone will inherit, so get it right once. For a detailed walkthrough of SSH key setup and hardening, see Ubuntu SSH Key Authentication and Hardening.
Ubuntu SSH Key Authentication and Basic Hardening
Set up SSH key-based login on Ubuntu, disable password authentication, and enable passwordless sudo — essential hardening for any server or VM template.
2. Install the Proxmox Guest Agent
The QEMU Guest Agent enables Proxmox to communicate with the VM for proper shutdown, IP reporting, and filesystem freeze/thaw during backups.
sudo apt-get update
sudo apt-get install -y qemu-guest-agent
sudo systemctl enable qemu-guest-agent
sudo systemctl start qemu-guest-agent
Then enable it in the Proxmox UI:
VM → Options → QEMU Guest Agent → Enabled
3. Update the system and reboot
Apply all pending updates before sealing the image:
sudo apt-get update
sudo apt-get upgrade -y
sudo reboot
4. Install Cloud-Init
Cloud-Init handles per-instance configuration on first boot — hostname, SSH keys, networking, and user setup.
sudo apt-get install -y cloud-init5. Remove SSH host keys
Each VM needs unique SSH host keys. Removing them from the template ensures Cloud-Init regenerates fresh keys for every clone.
sudo rm /etc/ssh/ssh_host_*6. Clean the image and power off
Run the final cleanup sequence to remove instance-specific data:
sudo apt clean
sudo apt autoremove
sudo cloud-init clean
sudo cloud-init clean --machine-id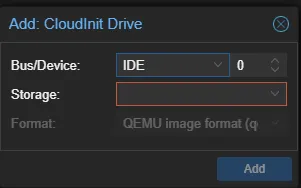
sudo poweroff7. Add a Cloud-Init drive in Proxmox
Add a Cloud-Init drive to the VM in the Proxmox UI. The drive type depends on your firmware:
In the Proxmox web UI: select the VM → Hardware → Add → CloudInit Drive → choose your storage and the correct bus type.
- OVMF (UEFI): Add a SCSI Cloud-Init drive

- SeaBIOS: Add an IDE Cloud-Init drive
8. Configure Cloud-Init defaults
Open the Cloud-Init section of the VM and set default values that every clone should inherit.
| Option | Example value |
|---|---|
| User | username |
| Password | (leave empty — use SSH keys) |
| DNS domain | example.localdomain |
| DNS servers | 1.1.1.1 8.8.8.8 |
| SSH public key | ssh-ed25519 AAAA... user@host |
| IP Config (net0) | DHCP |
After setting the values, click Regenerate Image to write the configuration to the Cloud-Init drive.
9. Convert the VM to a template
With the VM powered off and Cloud-Init configured, convert it to a template:
- Select the VM in the Proxmox sidebar
- Right-click (or use the top-right menu)
- Click Convert to template
10. Clone the template
To deploy a new VM from the template:
- Right-click the template in the Proxmox sidebar
- Click Clone
- Choose Full Clone (independent copy) or Linked Clone (shares base disk, saves space)
- Set a name and target storage
11. Final Cloud-Init configuration
Open the cloned VM and go to the Cloud-Init section. Override the per-instance values:
| Option | Example value |
|---|---|
| User | username (or keep inherited) |
| DNS domain | prod.localdomain companyname.com |
| DNS servers | 1.1.1.1 8.8.8.8 |
| SSH public key | (keep inherited or add a different key) |
| IP Config (net0) | ip=10.0.1.50/24,gw=10.0.1.1 (static) or DHCP |
Click Regenerate Image to apply the changes.
12. Power on
Start the cloned VM. Cloud-Init runs on first boot and applies your configuration — setting the hostname, injecting SSH keys, configuring networking, and regenerating SSH host keys.
Your new VM is ready to use, identical to the golden image but with its own unique identity.